Hi friend! Welcome back to my cozy corner of the internet.
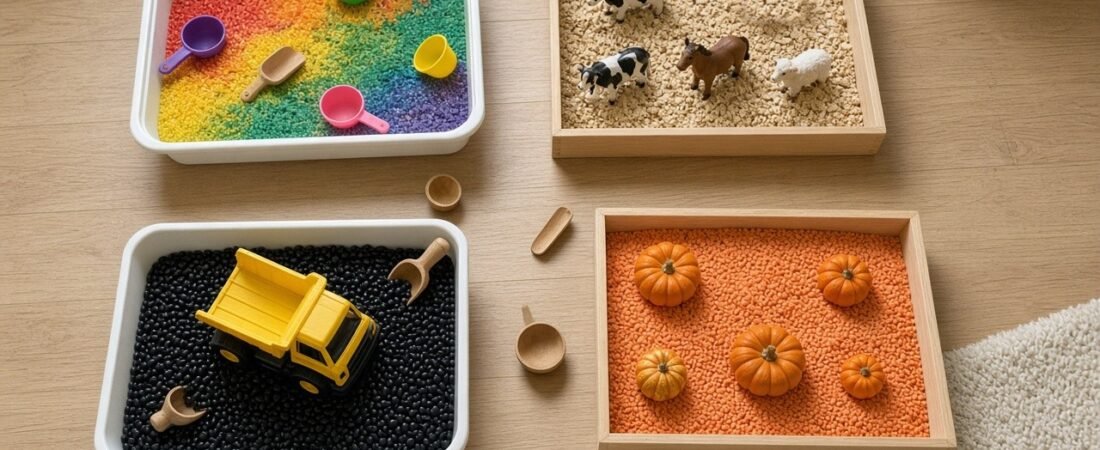
If you read my last post on screen-free activities, you know sensory bins are a big favourite in our home. My son Yusuf can sit with a simple tray of rice and a few scoops for half an hour,. So many of you asked for more, so here is my list of my best sensory bin ideas for toddlers.
Every bin here uses simple things like rice, oats, beans, pasta and a handful of toys you probably already own. Each one comes with step by step photos, a supply list, an age range and my best tip.
What Is a Sensory Bin?
A sensory bin is simply a shallow container filled with a base material, like rice or oats, plus a few tools and toys. Kids scoop, pour, dig, hide and find, and that hands-on play builds fine motor skills, language and focus. It is also wonderfully calming.
Basic supplies
- A shallow bin or tray. A white box or light wood tray, 10 to 15 cm deep.
- A filler. Rice, oats, dried beans, pasta, lentils, sand or water.
- Tools. Scoops, measuring cups, spoons, funnels, tongs and small bowls.
- A few themed toys. Animals, trucks or shapes to match the theme.
- An old sheet or a splat mat. It catches spills so cleanup takes two minutes.
Safety first
- Always supervise. Sensory bins are never a leave-them-alone activity for toddlers.
- Watch for choking hazards. Dried beans, small pasta, small toys and water beads can all be dangerous for little ones who still mouth things.
- Go taste-safe for under 3s. For younger toddlers I stick to oats, cereal, cooked pasta, crinkle paper or plain water, and I keep toys large.
- Check for allergies. Skip any food filler your child is allergic to.
1. Rainbow Rice Sensory Bin
Ages 2 to 5Prep: 20 minutes (plus drying)
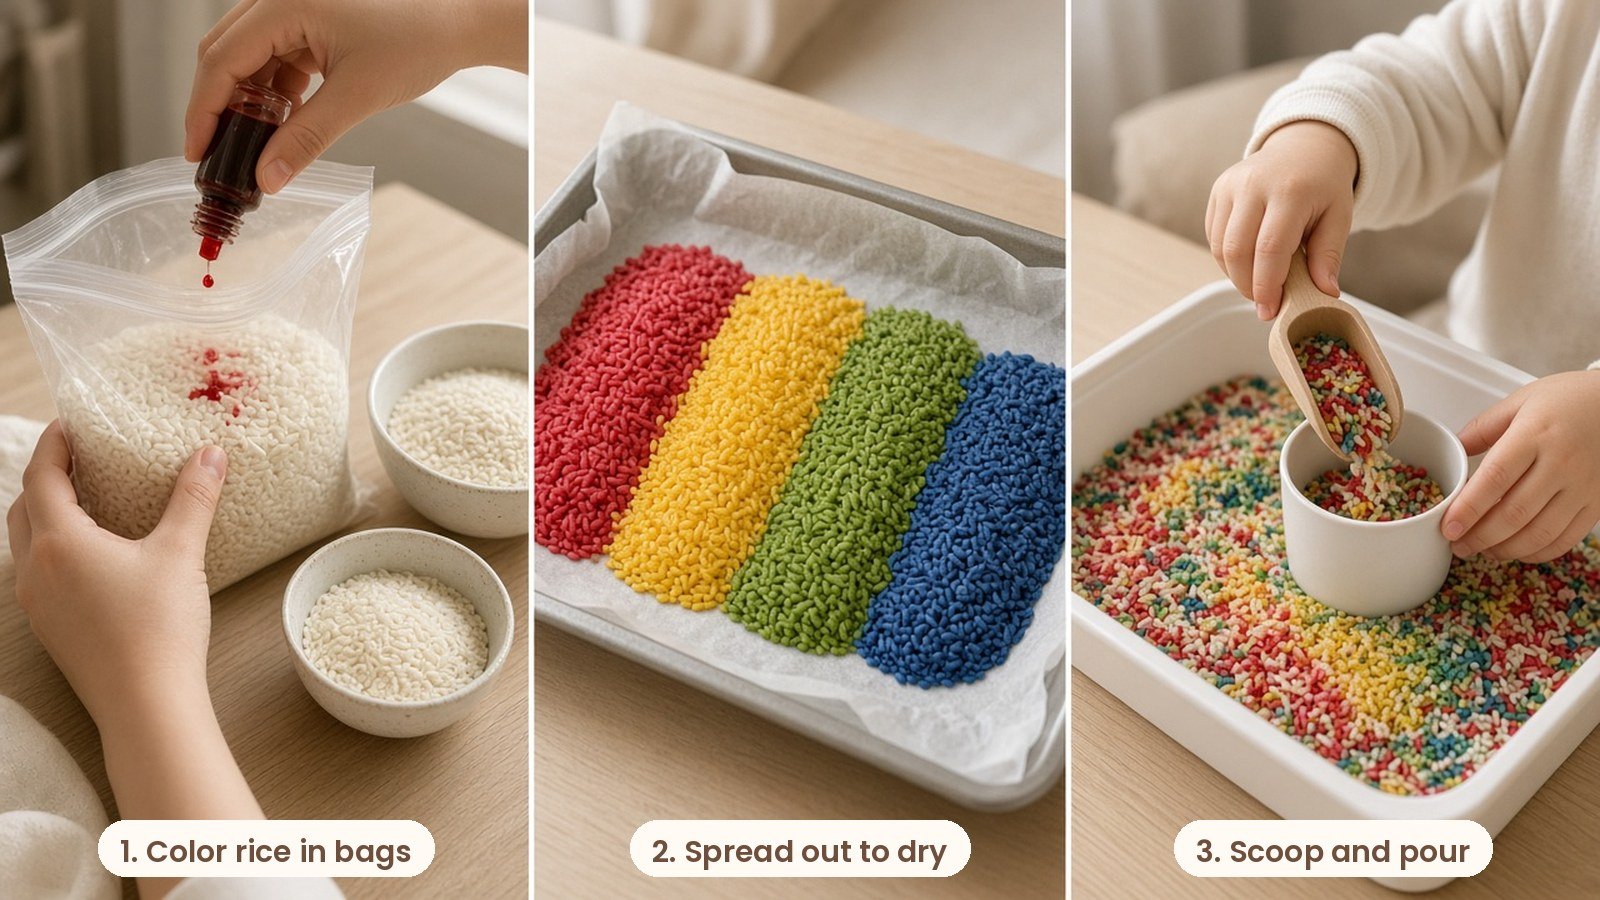
Why I love it: This is the bin that started it all in our home. The colors are so cheerful, and you can reuse the rice for other themes later.
What you need:
- 2 to 3 cups of plain white rice
- Zip bags, one per color
- A few drops of food coloring per bag
- A splash of white vinegar (optional, helps the color spread)
- A white tray, scoops and small cups
How to do it:
- Put one cup of rice in each bag with a few drops of food coloring and a tiny splash of vinegar.
- Seal the bag and let your toddler shake and squish it until the rice is fully colored.
- Spread the rice on a lined tray to dry for about an hour.
- Mix the colors in a white bin, add scoops and cups, and let the pouring begin.
My tip: Use liquid food coloring sparingly. Too much and the color can rub off on little hands. Once it is fully dry, it will not stain.
2. Construction Zone with Black Beans and Trucks
Ages 2 to 5Prep: 5 minutes
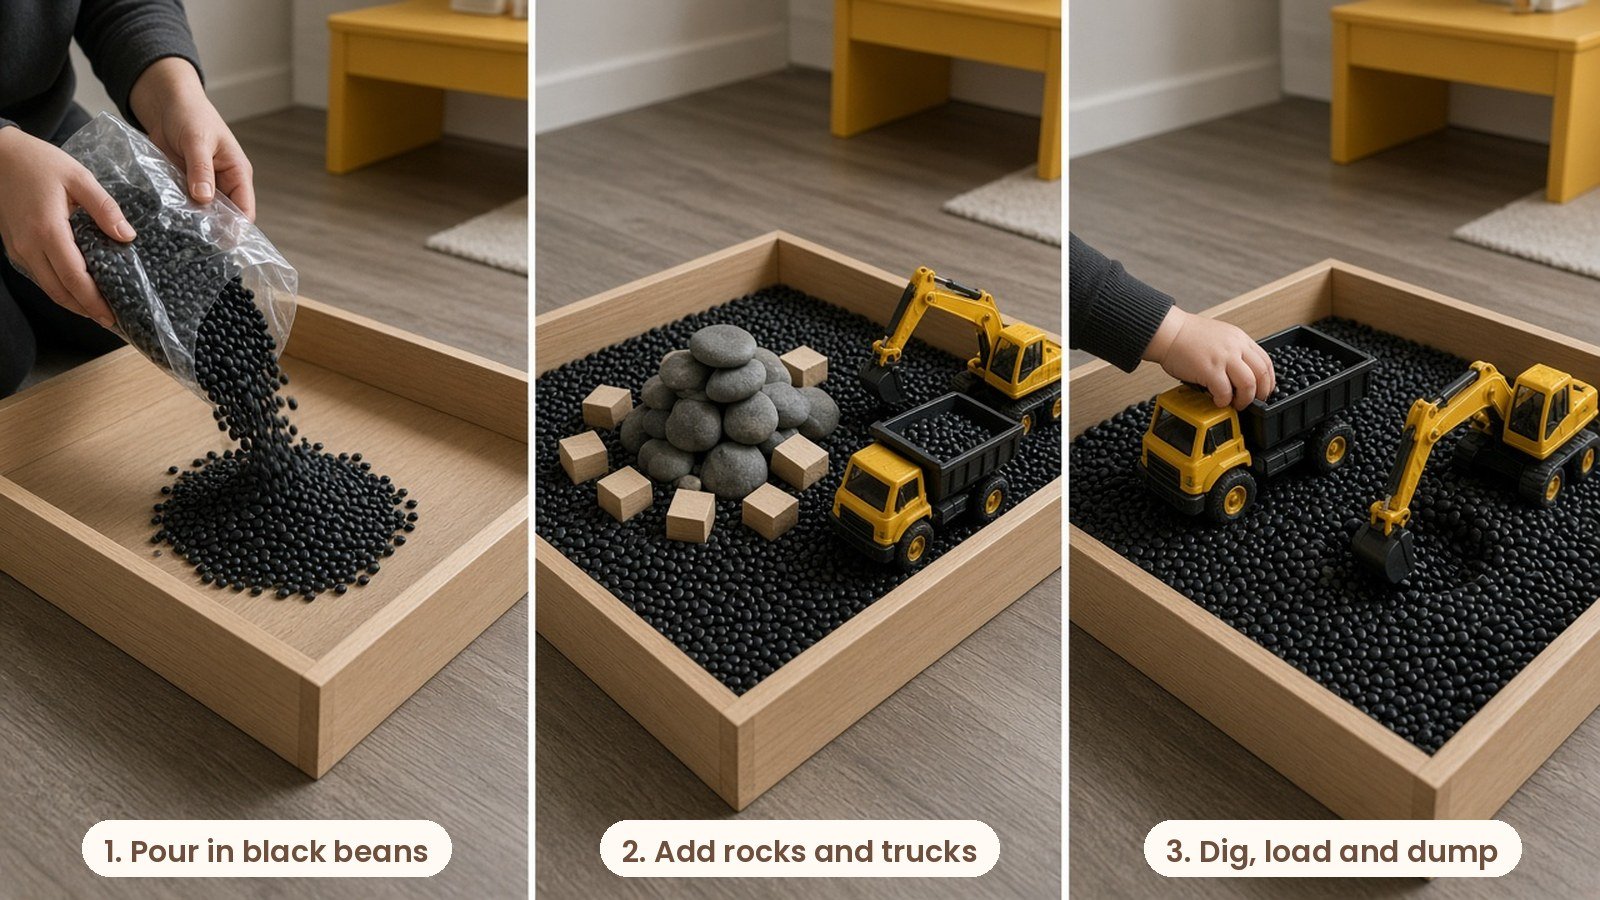
Why I love it: If your little one loves anything with wheels, this bin is pure joy. Dried black beans make the best digging sound, and Yusuf spends ages loading and dumping them with his trucks.
What you need:
- A large bag of dried black beans
- Toy dump trucks, diggers and a bulldozer
- A few smooth rocks or wooden blocks
- Small shovels or spoons
How to do it:
- Pour the black beans into a light wood or white bin, about 5 cm deep.
- Add a little pile of smooth rocks or blocks as a building site.
- Park the trucks around the edges and let your child dig, load and dump.
My tip: Make a road out of masking tape on the floor beside the bin so the trucks can drive their loads away. It doubles the playtime.
3. Ocean Adventure Sensory Bin
Ages 2 to 6Prep: 10 minutes
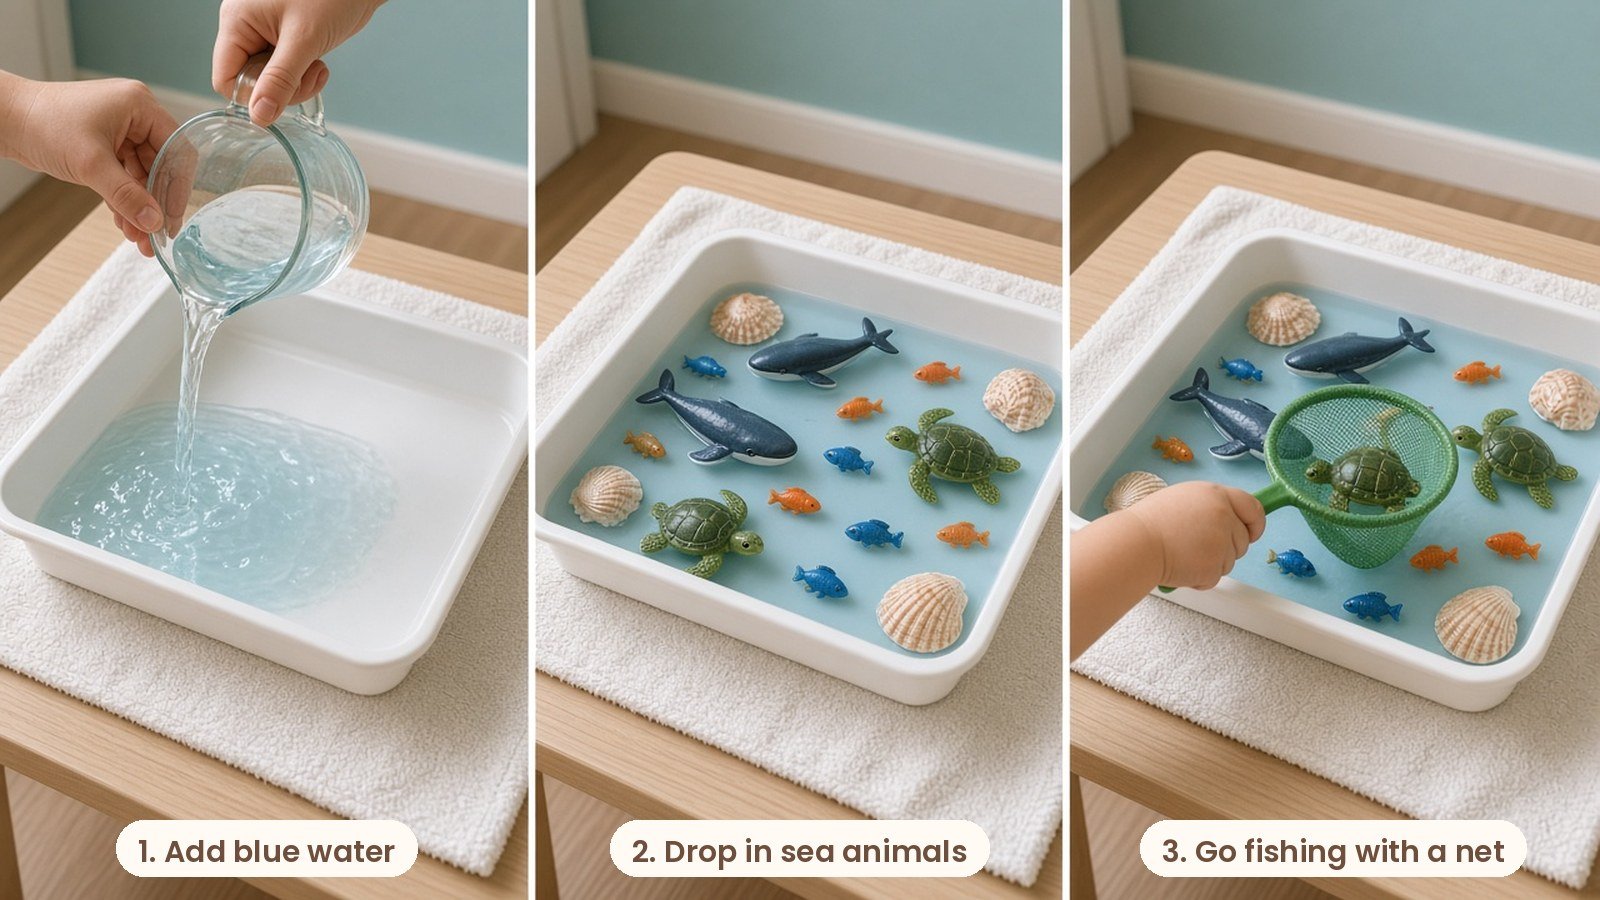
Why I love it: This bin brings the beach indoors on a cold day. Fishing out a whale or a turtle with a little net feels like a real adventure, and it is a gentle way to learn animal names.
What you need:
- A white bin with a little blue-tinted water, or blue-dyed rice
- Toy sea animals like whales, turtles, fish and octopus
- A few large seashells
- A small fish net, scoops and cups
- A towel underneath
How to do it:
- Fill the bin with a few centimetres of water and add one drop of blue food coloring, or use blue-dyed rice for a dry version.
- Drop in the sea animals and large shells.
- Hand over the net and scoops and let your child go fishing.
My tip: Many ocean bins online use water beads, but I skip them for toddlers. Water beads are a serious choking and swallowing hazard, so only use them with older kids under close supervision. Blue water or blue rice looks just as pretty.
4. Farm Life Sensory Bin with Oats
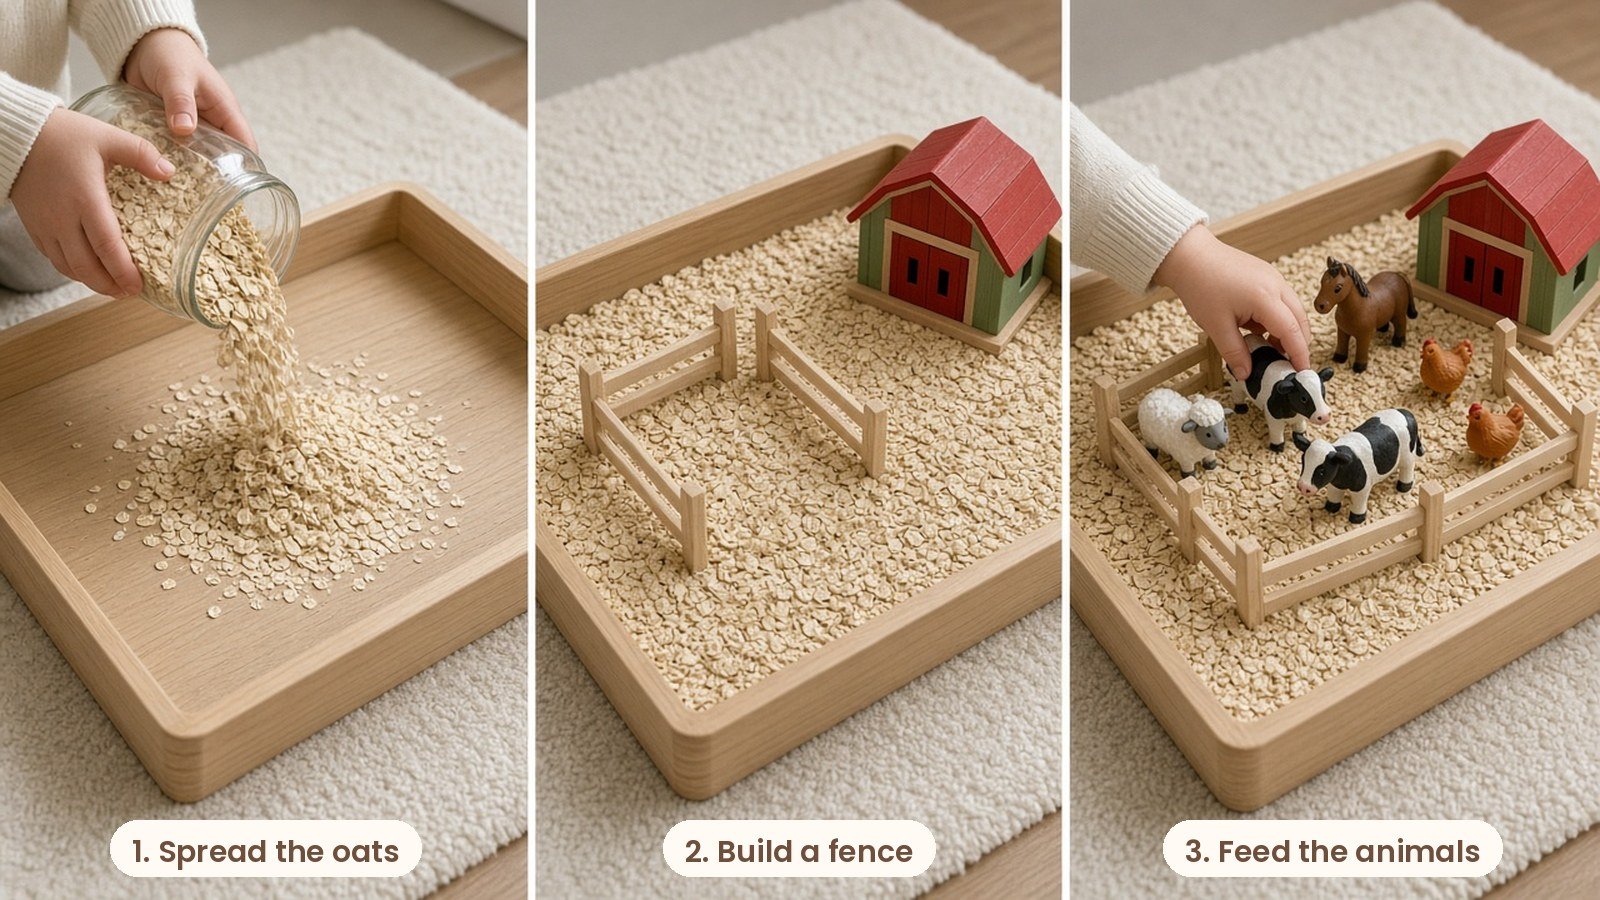
Ages 1.5 to 4Prep: 5 minutes
Why I love it: Rolled oats are soft, cheap and taste-safe, which makes this my favourite bin for younger toddlers. Yusuf loves making the animal sounds as he moves each one into the barn.
What you need:
- Rolled oats
- Toy cows, sheep, horses and chickens
- A small wooden fence or craft sticks
- A toy barn or a small box
- Scoops and a little bucket
How to do it:
- Pour the oats into a light wood tray and smooth them out like a field.
- Stand up the fence pieces to make a little pen.
- Add the animals and a barn, then let your child feed and move them around.
My tip: Add a handful of dried split peas as pretend animal feed. Scooping it into a tiny bucket is great fine motor practice.
5. Colorful Pasta Play Bin
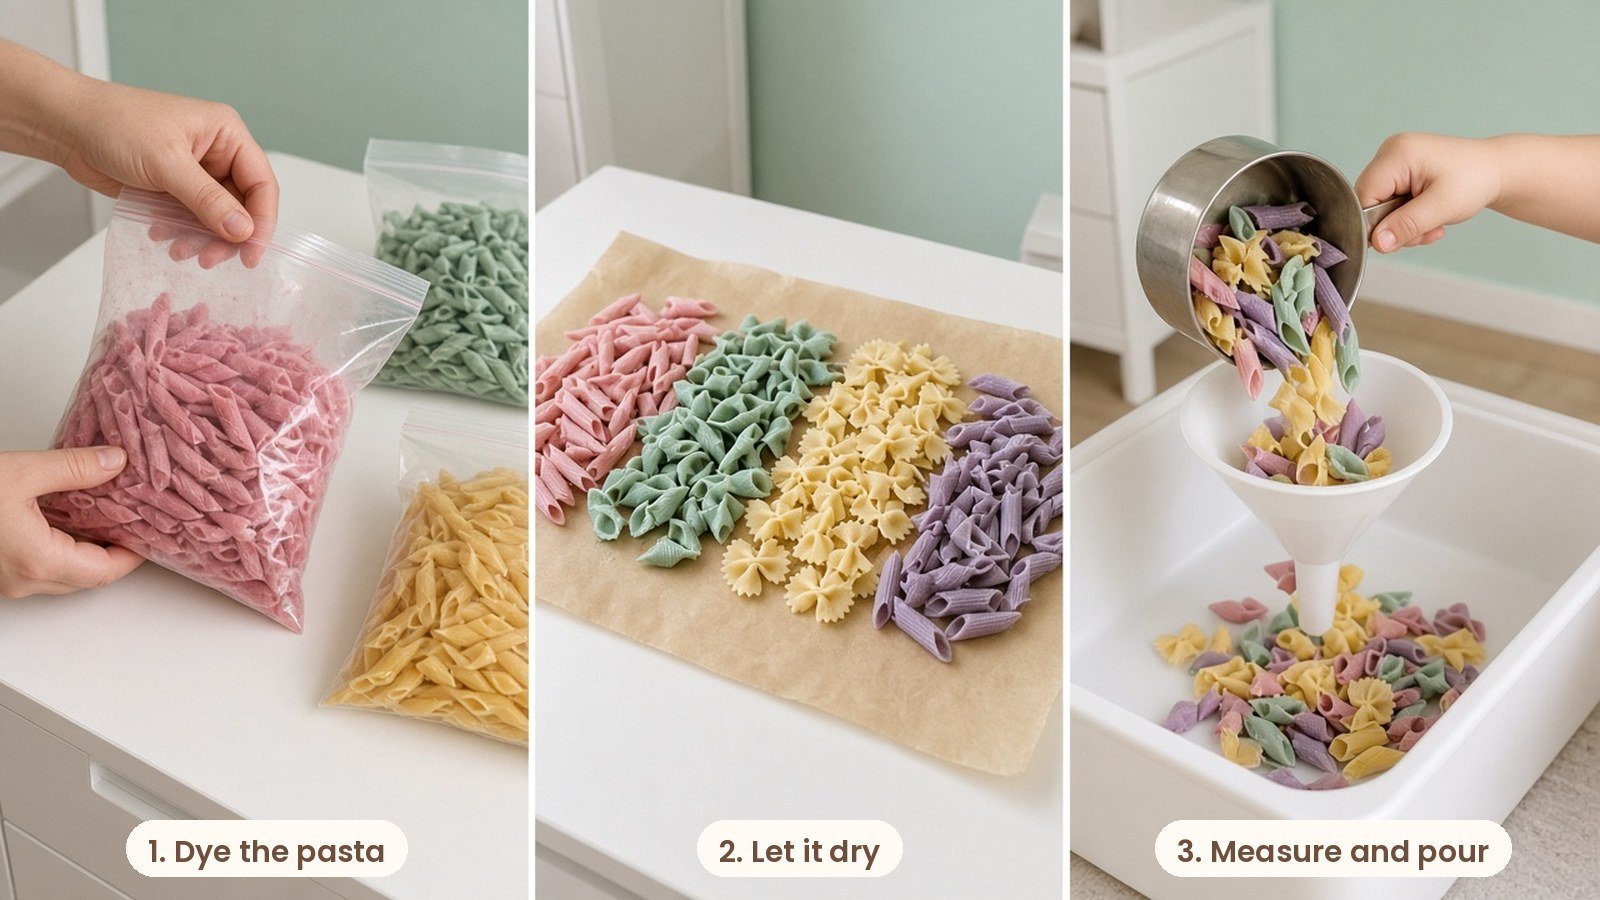
Ages 2 to 5Prep: 15 minutes (plus drying)
Why I love it: Dyed pasta feels chunky and satisfying, and it is easy for little hands to grab. Pouring it between cups is a sneaky early math lesson.
What you need:
- Dry pasta in different shapes, like penne, shells and bow ties
- Zip bags and food coloring
- Measuring cups, spoons and a funnel
- A white bin
How to do it:
- Dye the pasta the same way as rainbow rice, shaking each color in its own bag.
- Spread it out on a tray until it is completely dry.
- Pour it into the bin with measuring cups and a funnel and let your child fill and pour.
My tip: Give older toddlers some thick string or pipe cleaners to thread the penne into necklaces. Supervise, as pasta is a choking risk for very young babies.
6. Winter Snow Day Sensory Bin
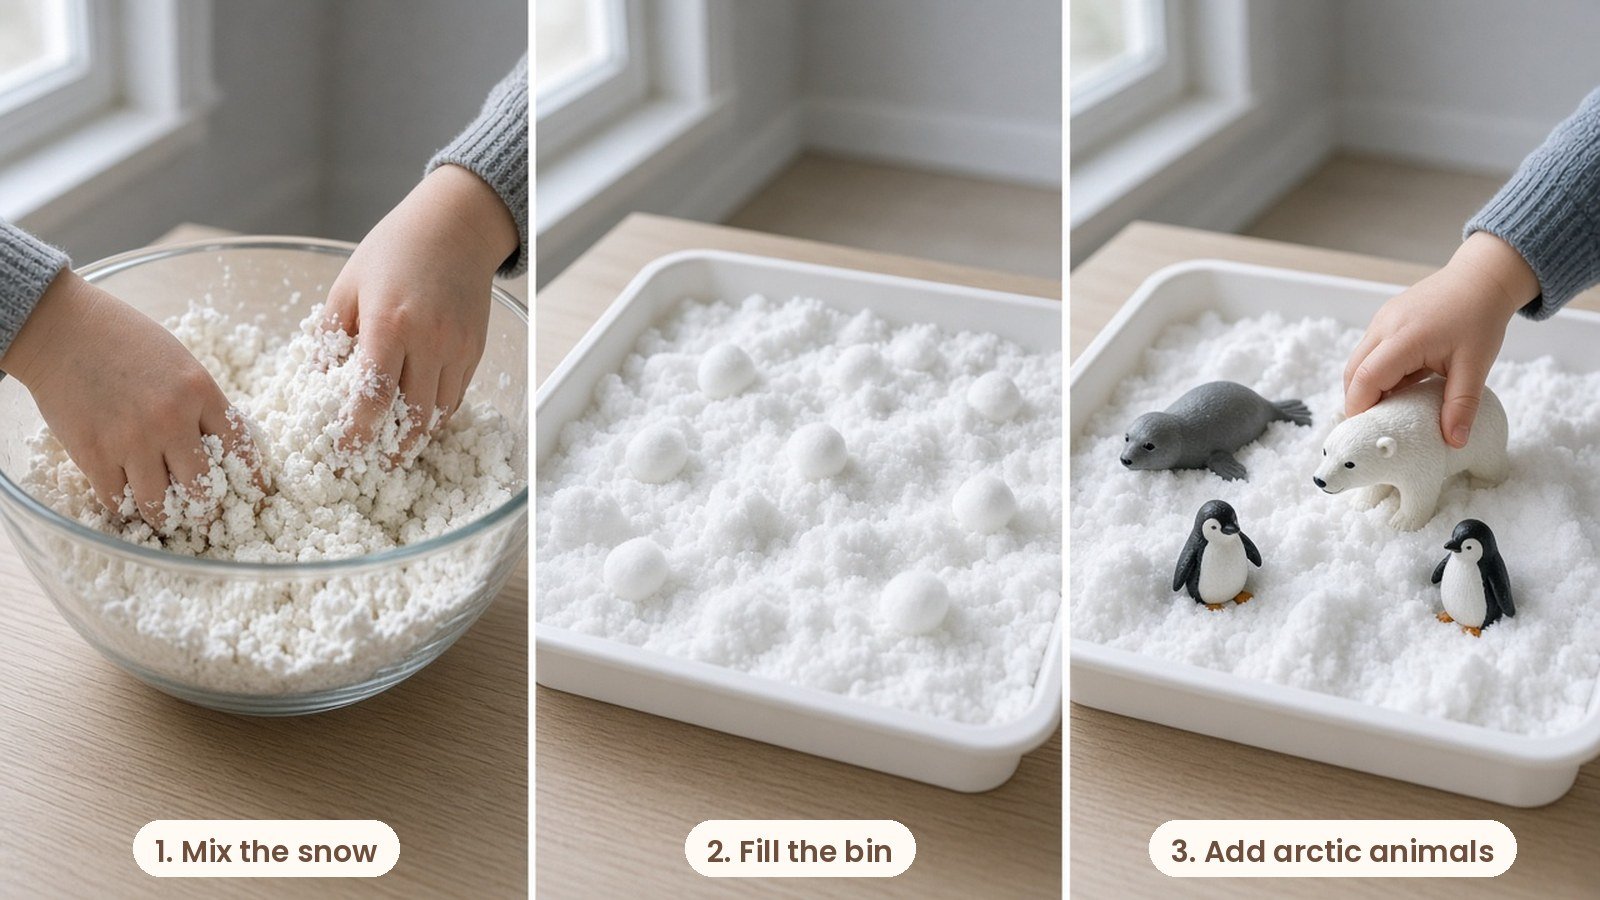
Ages 2 to 6Prep: 10 minutes
Why I love it: We rarely get real snow, so this bin is a winter treat in our home. The homemade snow is cool, soft and moldable, and it smells lovely.
What you need:
- 2 cups of baking soda
- About 1/3 cup of hair conditioner
- Cotton balls (an easy no-mix option for little ones)
- Toy polar bears, penguins and seals
- Small scoops and a few blue pebbles or blocks for ice
How to do it:
- Mix the baking soda and conditioner with your hands until it feels like soft snow.
- Pile the snow into a white bin and add a few cotton balls for snowballs.
- Add the arctic animals and let your child build snow hills and dens.
My tip: For kids who still put everything in their mouth, use only cotton balls and supervise closely. The baking soda snow is best for kids who are past the mouthing stage.
7. Baking Fun Sensory Bin
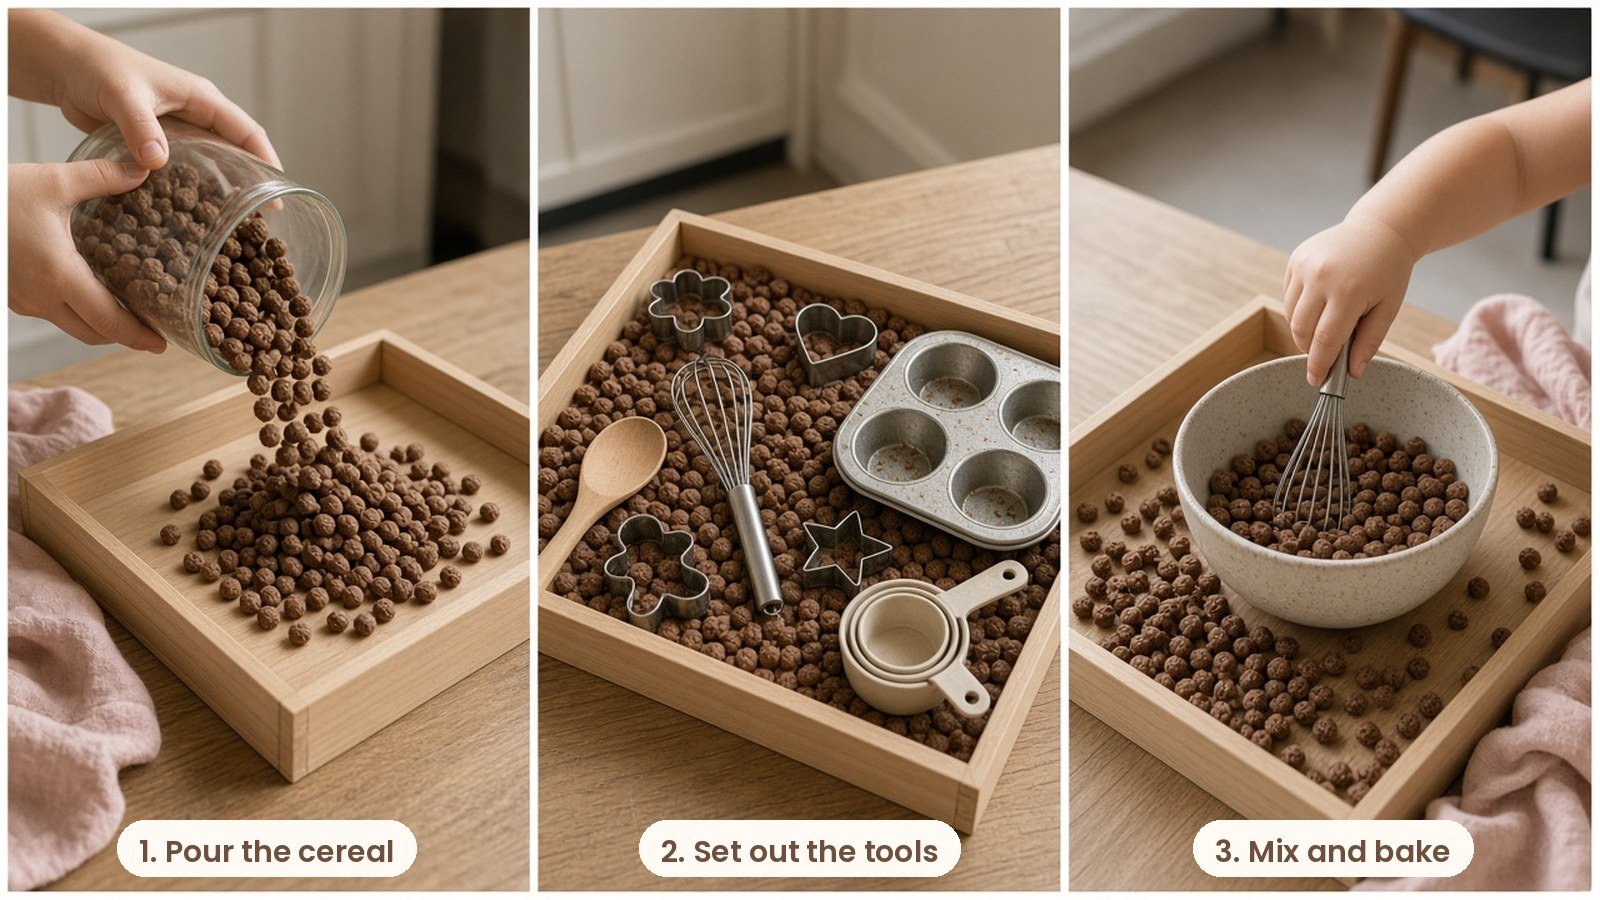
Ages 1.5 to 5Prep: 5 minutes
Why I love it: My kids love helping me bake, and this bin lets them play baker any time. Cocoa cereal smells like chocolate and is taste-safe, so I can relax when tiny hands go straight to the mouth.
What you need:
- A box of cocoa puff cereal
- Cookie cutters in fun shapes
- A small whisk, wooden spoon and measuring cups
- Mini mixing bowls and a muffin tin
How to do it:
- Pour the cereal into a light wood tray.
- Set out the bowls, whisk, spoons and cookie cutters.
- Let your child mix, scoop into the muffin tin and press the cookie cutters into piles.
My tip: Crush a little of the cereal in a bag first. It turns into a sandy chocolate dough texture that holds cookie cutter shapes better.
8. Spring Garden Sensory Bin
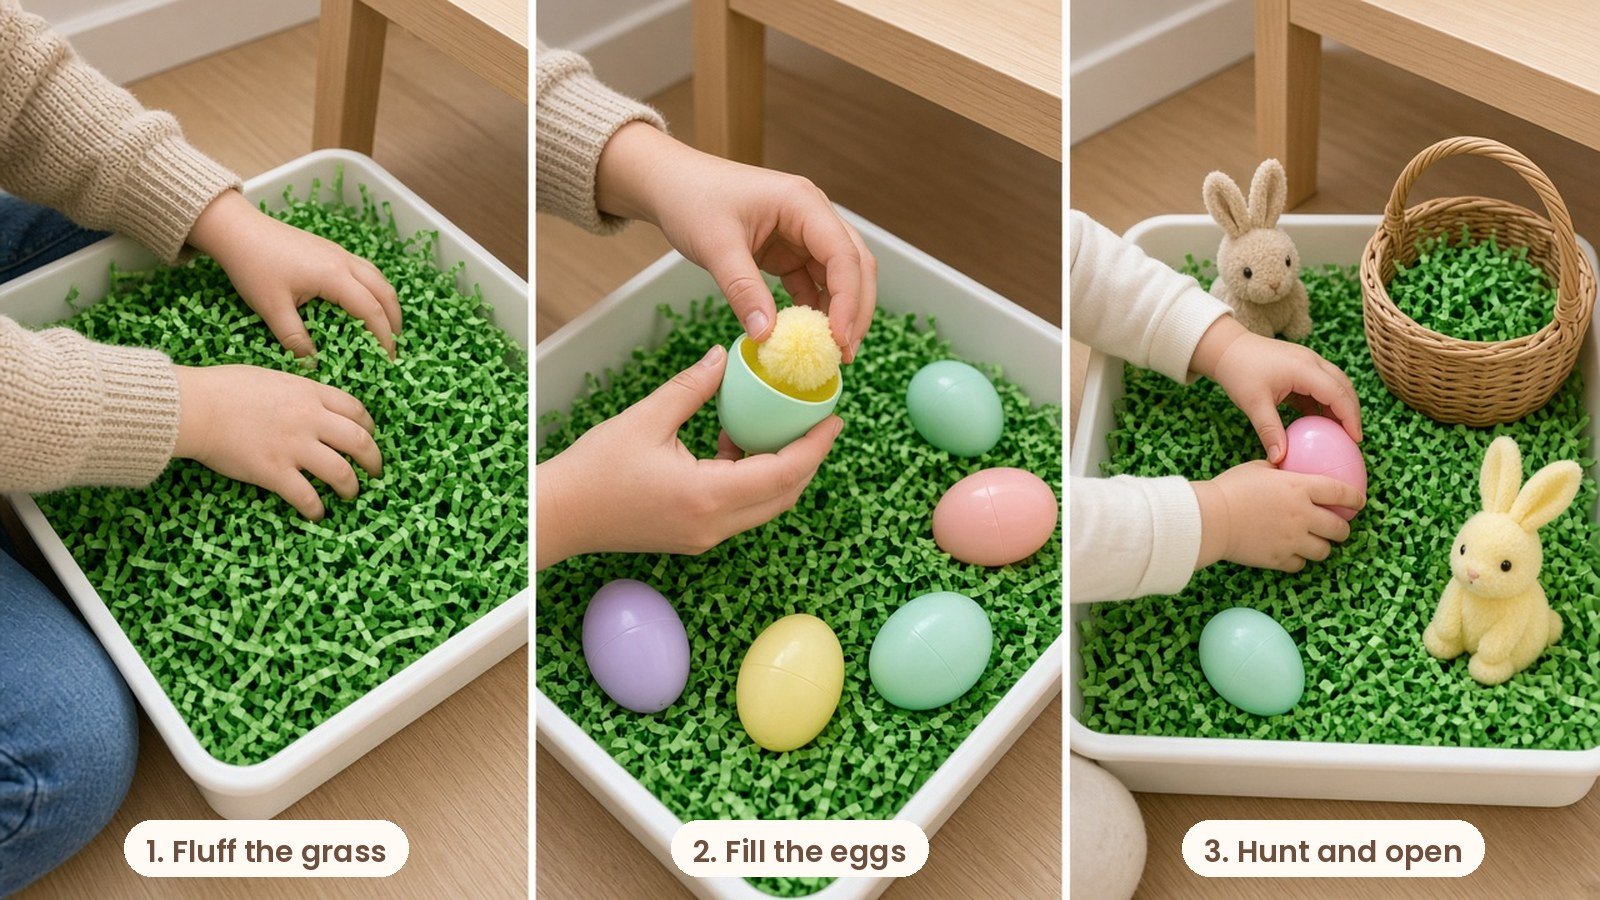
Ages 1.5 to 5Prep: 10 minutes
Why I love it: This one is so light and fresh, and it is completely mess-free. Opening the eggs is wonderful hand practice.
What you need:
- Green crinkle paper grass
- Pastel plastic eggs that open
- Toy bunnies, chicks and ladybugs
- Large pom poms to hide inside the eggs
- A small basket
How to do it:
- Fluff the green paper grass into a white bin.
- Hide a pom pom or tiny toy inside each egg and close it.
- Tuck the eggs and bunnies into the grass and let your child find and open them.
My tip: Use big pom poms or toys that are too large to swallow, and count the eggs together as they go into the basket.
9. Dino Dig Sensory Bin
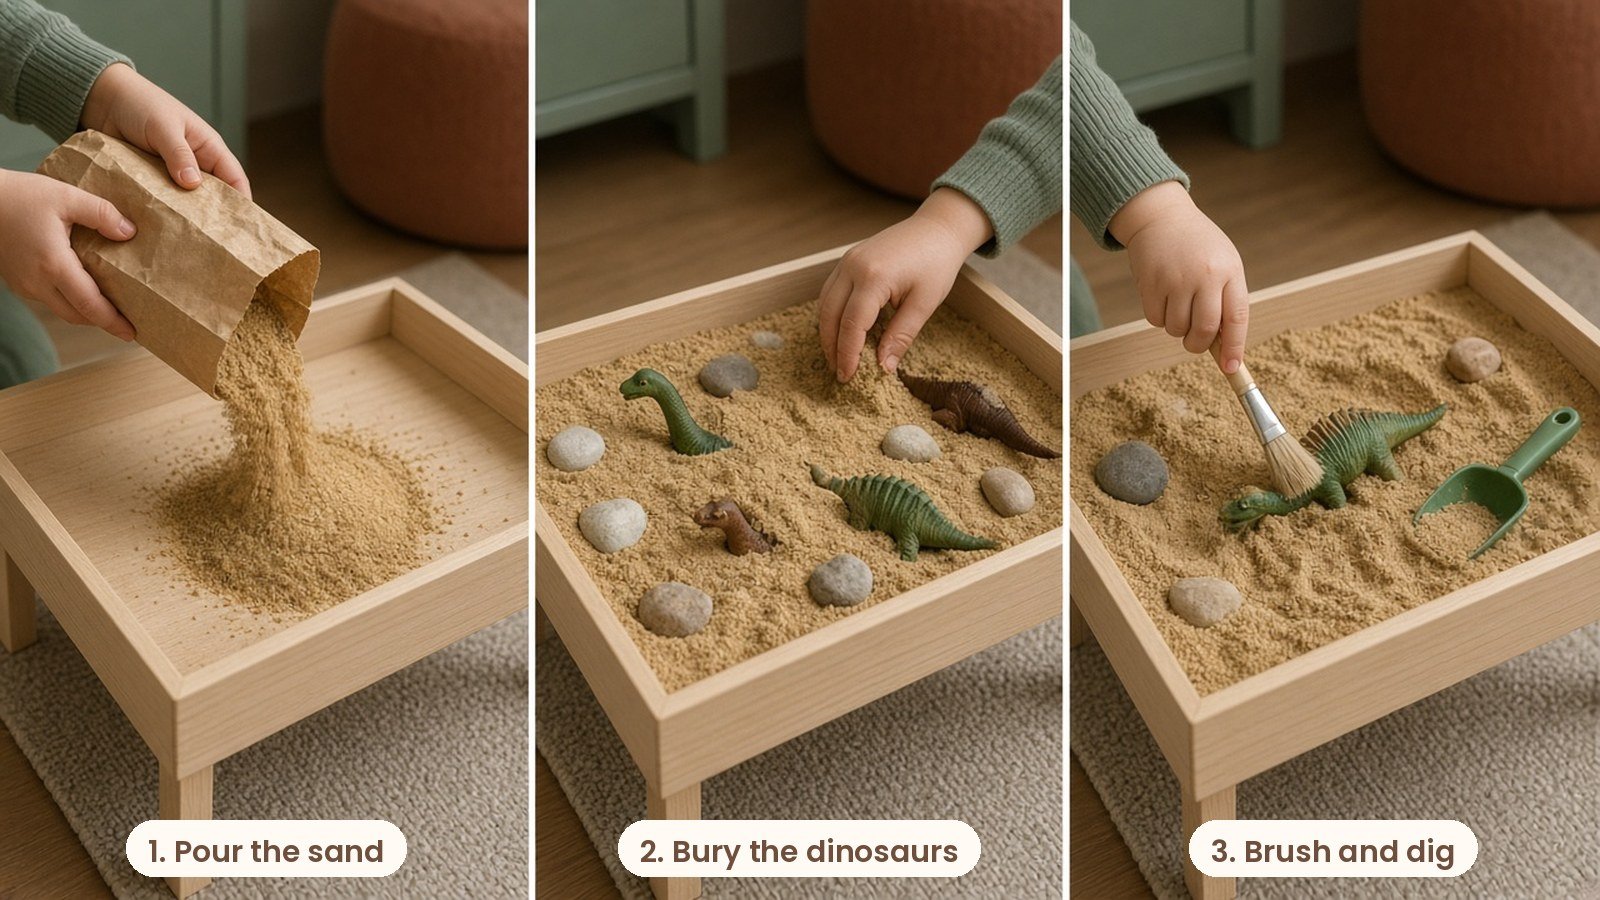
Ages 3 to 7Prep: 10 minutes
Why I love it: Every child turns into a tiny scientist with this bin. Brushing sand off a buried dinosaur is calm, slow play.
What you need:
- Clean play sand
- Toy dinosaurs and a few dinosaur skeleton pieces
- Smooth rocks
- Soft paintbrushes and a small shovel
- A magnifying glass (optional)
How to do it:
- Pour the play sand into a light wood bin.
- Bury the dinosaurs so just a tail or head peeks out.
- Give your child brushes and a shovel to dig and dust off each fossil.
My tip: Slightly damp sand keeps the dust down and holds its shape better. A spray bottle of water works perfectly.
10. Bubble Foam Toy Wash
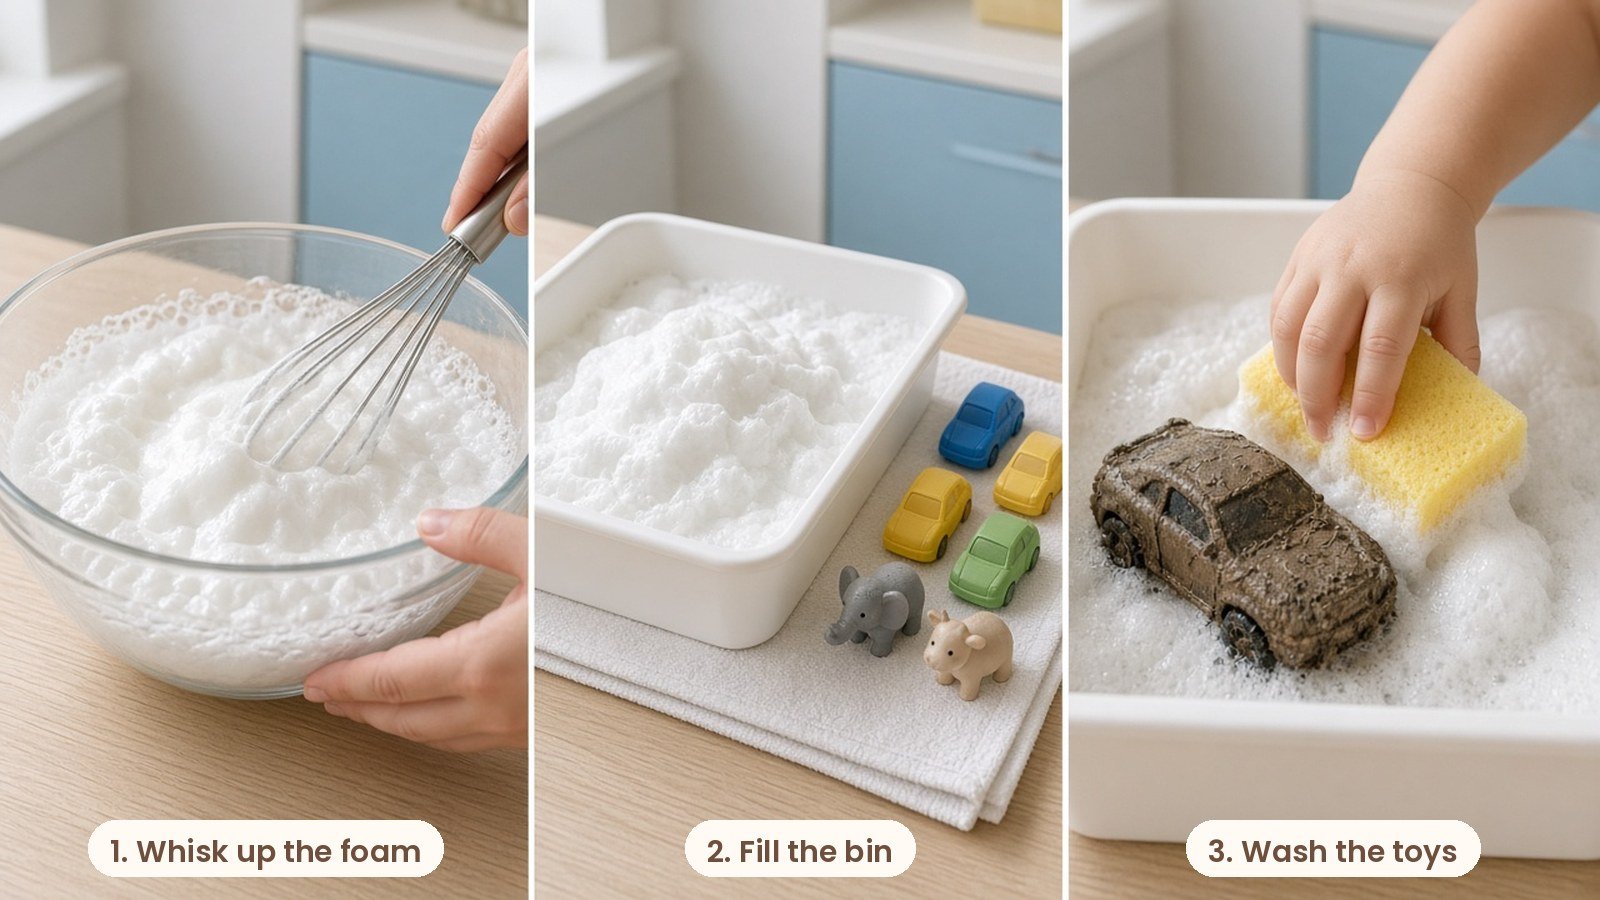
Ages 2 to 6Prep: 5 minutes
Why I love it: Yusuf takes his toy washing job very seriously, and I get clean toys at the end. That is a win for both of us.
What you need:
- A little water and a squeeze of gentle baby bath soap
- A hand whisk or hand mixer
- A shallow white bin
- Plastic toy cars and animals
- Sponges, an old toothbrush and a towel
How to do it:
- Add a little water and soap to a bowl and whisk until thick foam forms.
- Scoop the foam into a white bin.
- Let your child scrub the toys with sponges, then dry them on the towel.
My tip: Play near the sink or outdoors if you can. Use tear-free soap and keep foam away from eyes.
11. Alphabet Hunt Sensory Bin
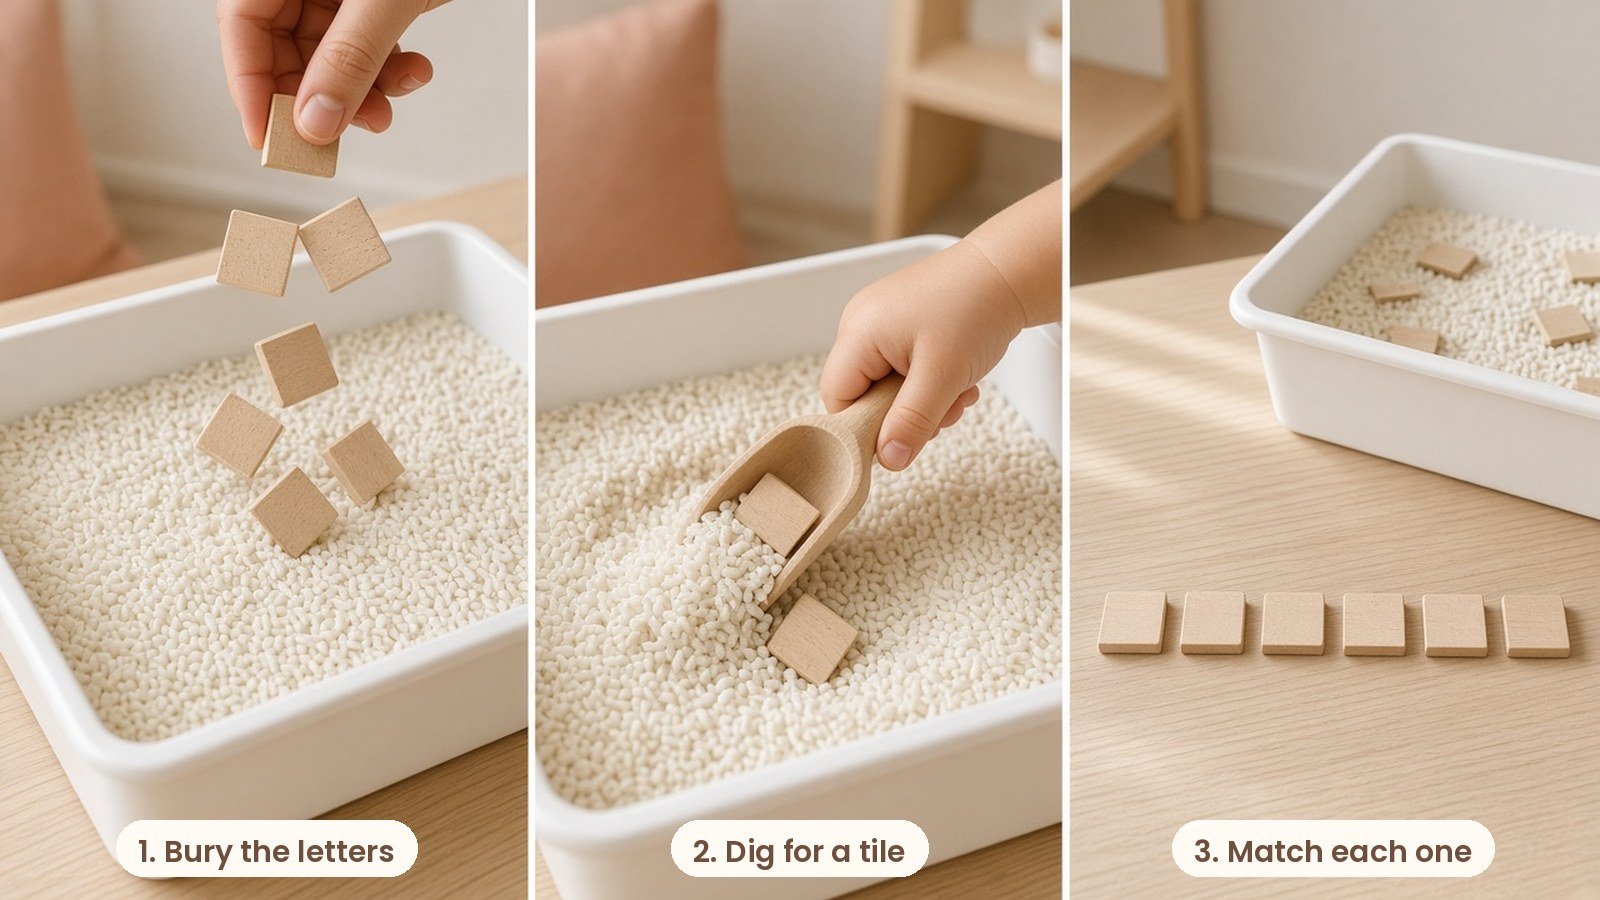
Ages 3 to 6Prep: 5 minutes
Why I love it: This is my favourite way to make letter practice feel like a game. My niece Maryam asks for the letter hunt before she even takes her shoes off.
What you need:
- Plain or lightly tinted rice
- Wooden letter tiles or magnetic letters
- A small scoop or tweezers
- A simple letter sheet or the fridge to match letters on
How to do it:
- Pour the rice into a white bin and bury the letters.
- Let your child dig and pull out one letter at a time.
- Say the letter and its sound together, then match it on the sheet or stick it on the fridge.
My tip: Start with the letters in your child’s name. Finding their own name is so exciting for little ones.
12. Cozy Fall Harvest Sensory Bin
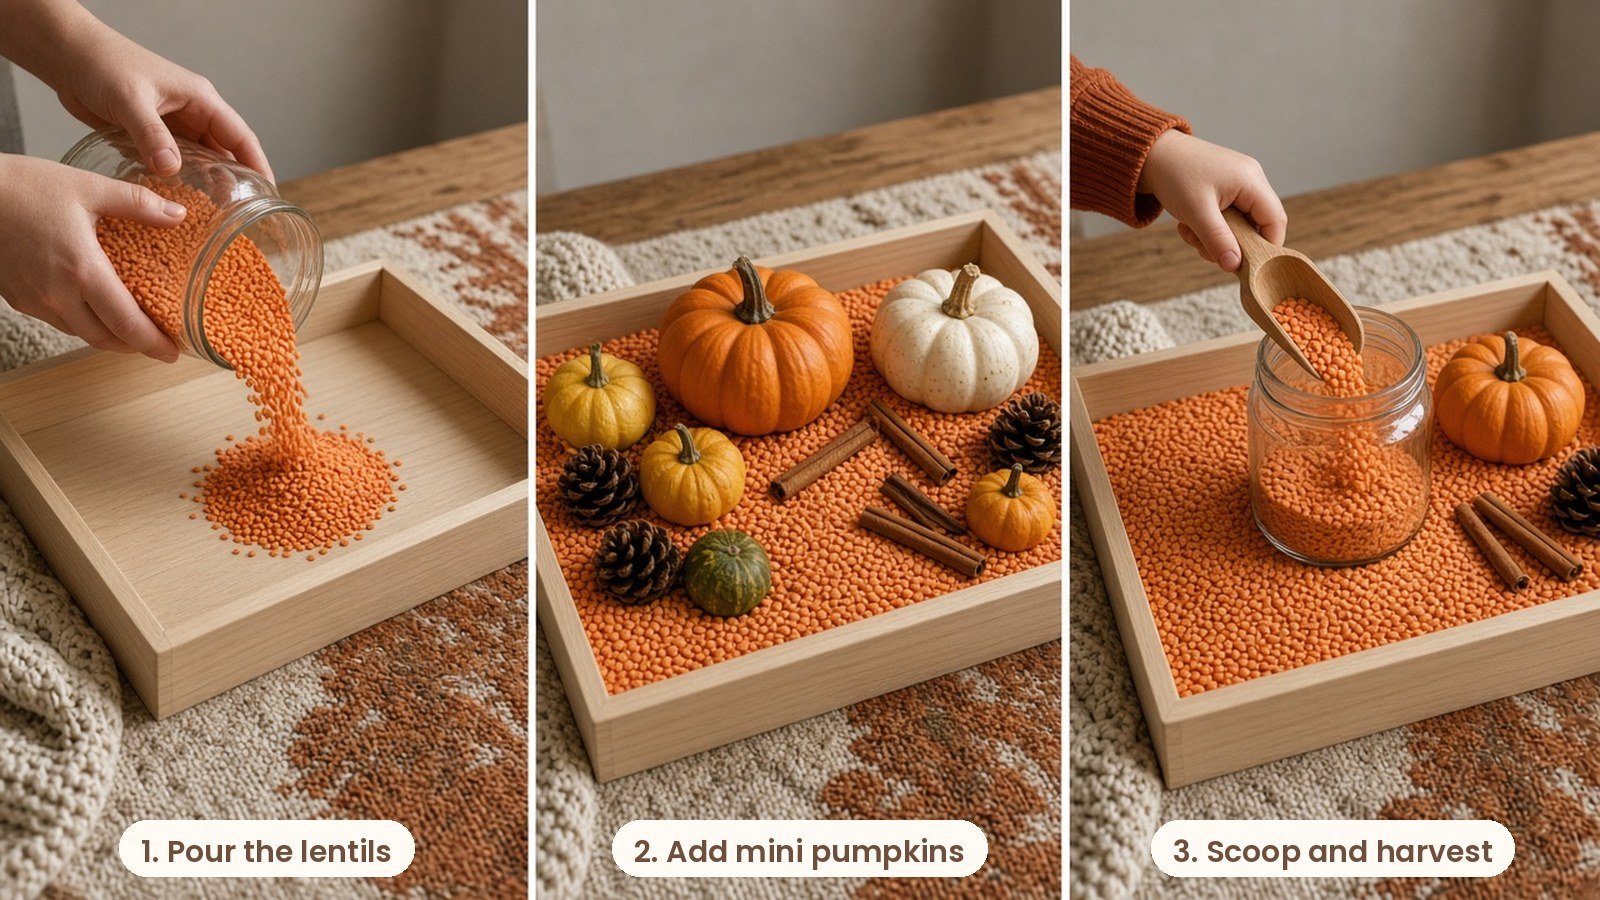
Ages 2 to 5Prep: 10 minutes
Why I love it: This bin smells and feels like fall. Lentils are lovely to run your fingers through.
What you need:
- Red or orange lentils
- Mini pumpkins and small gourds
- Pinecones and cinnamon sticks
- Wooden scoops and small jars
How to do it:
- Pour the lentils into a light wood tray.
- Nestle in the mini pumpkins, pinecones and cinnamon sticks.
- Let your child scoop the lentils into jars and harvest the pumpkins.
My tip: Toss a few cinnamon sticks in the bin. The warm scent makes this a full sensory experience without any extra work.
My Tips for Stress-Free Sensory Play
Set clear bin rules
In our home the filler stays in the bin, and we use the tools instead of throwing.
Rotate your bins
I keep two or three bins in lidded boxes and swap them each week, so every bin feels new again.
Keep it small
A few centimetres of filler and four or five toys is plenty. Too much stuff overwhelms little ones.
My friend Khadija keeps a sensory bin under the sofa for her daughter Aisha. On rainy afternoons she slides it out, and Aisha happily plays while Khadija finishes her Asr prayer and puts the kettle on.
FAQ: Sensory Bin Ideas for Toddlers
At what age can toddlers start sensory bins?
Simple taste-safe bins can work from around 18 months with close supervision. Save rice, beans and small pieces for kids who no longer mouth things, usually closer to age 3.
What is the best filler for a toddler sensory bin?
For young toddlers I love oats, cereal and crinkle paper. Rice and pasta are great once your child is a little older.
How do I keep sensory bin play from getting too messy?
Use a bin with high sides, lay a sheet underneath and only add a small amount of filler.
How long can you keep sensory bin fillers?
Dry fillers like dyed rice, pasta and beans last for months in a sealed box. Throw out anything wet, sticky or that has been in a mouth.
Ready to Set Up Your First Sensory Bin?
You do not need fancy kits to enjoy sensory play. A tray, a bag of oats and a few toys can turn an ordinary afternoon into a happy, calm memory. Start with one bin this week and see which one your toddler asks for again and again.
If you found this list helpful, save the pin to your kids activities board so you have these ideas ready for the next rainy day. I would love to hear which bin your little one loved the most!